Friday 28 September 2012

New Projects - Revell 1/72 Focke-Wulf TL Jaeger "Flitzer" and Minicraft 1/144 B-17G Flying Fortress


  Right onto the other two projects I am doing while I wait for the glue/paint to dry on the Puma.  I got this a while back and it is an "Luft46" project.  It's a cool plane, looks a lot like a Vampire/Demon or should I say that they look like this as this was designed in 1943 if my memory serves me correctly.  I am not too sure what decals I wanna use on it.  I think the mottle paintwork is a little bit advanced for my airbrushing skills at the moment.  So I might paint it in a Nightfighter paintwork... hhmm...

 
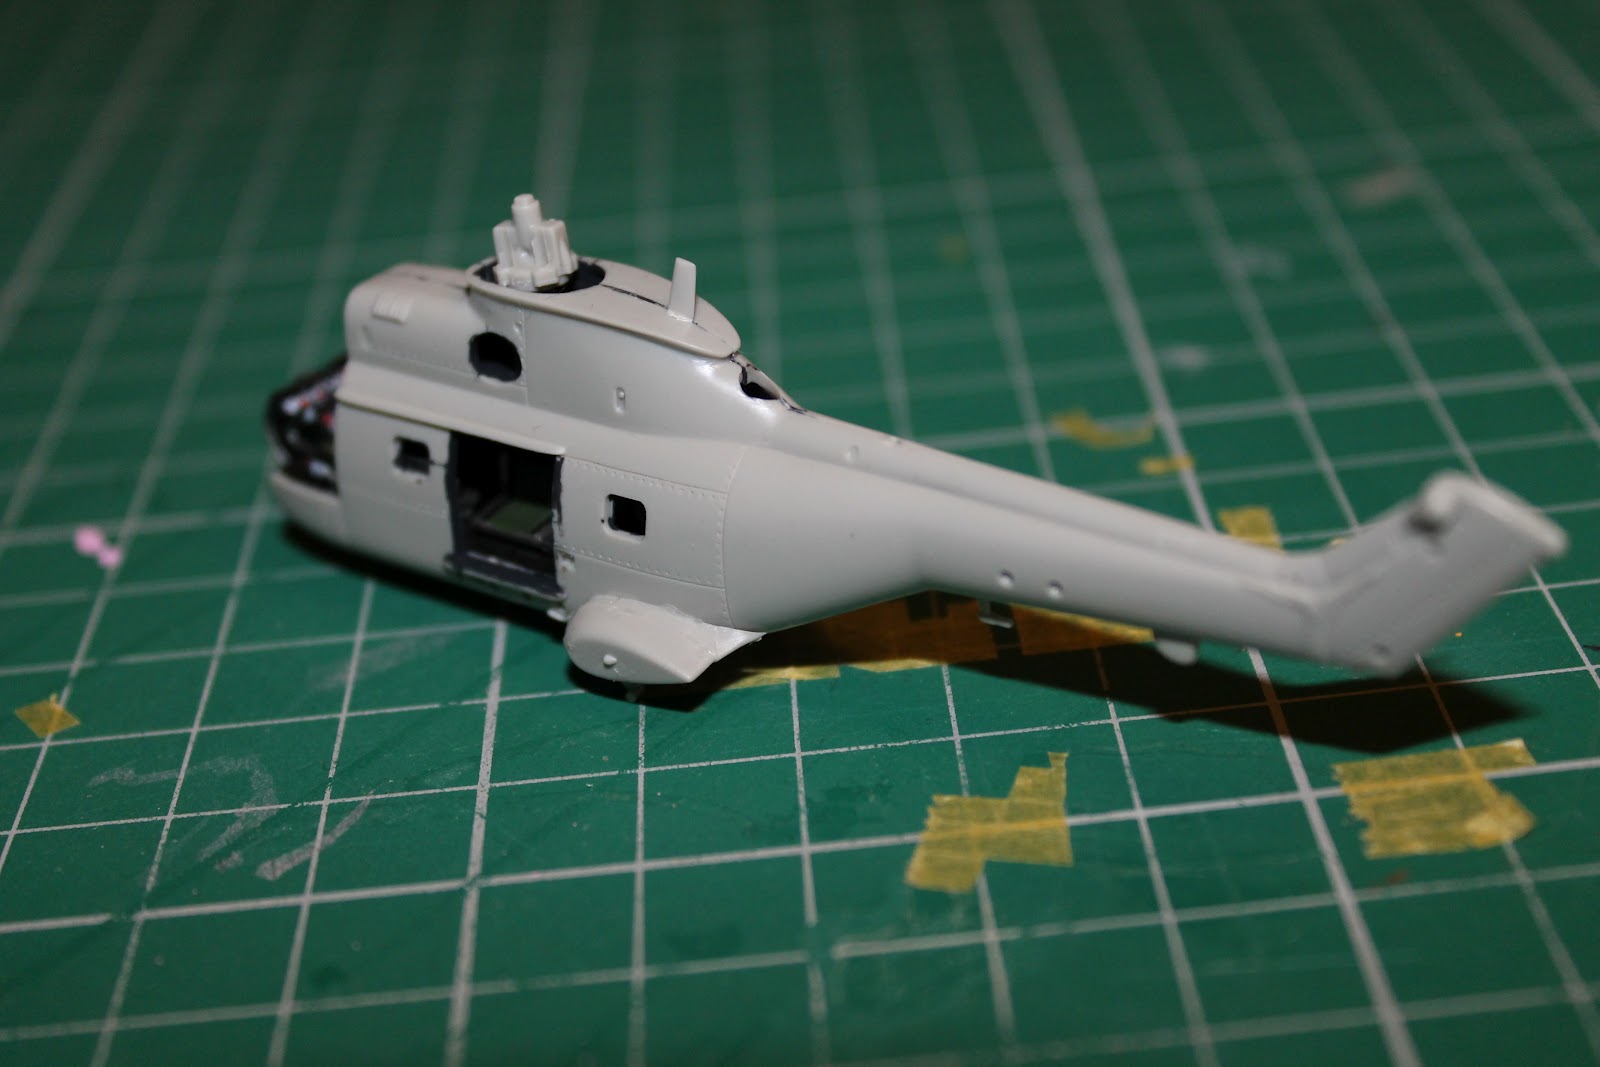
Well I have closed up the fuselage half's, after packing in a metric tonne of fishing shots.  I hope it's enough weight to keep her on her wheels and not sitting on her arse.  I didn't do much with the tub as I don't think you will be able to see any of the deeper detail.


   The two halves glued together, it took a while to get the thing to close up as it refused to close.  I don't know if that's because I put loads of shots in there or something I missed/didn't tidy up.  Hopefully the glue will cure and keep the bugger stuck.


  I am hoping you can see instrument panels/dials in this one.  I tried dry-brushing for the first time and it actually worked!  I am well impressed with it, yeah sad I know.  It looks pretty good I thinks. :)  Onto the B-17


   This is the box of it, I didn't pay that much for it if I recall right, got it from Hannants too.  Decided not to use the decals for the "Bit o'Lace" I am going to use something else instead.  Just waiting for them to turn up, well actually I gotta wait for the model to be finished first, then decal it.
 

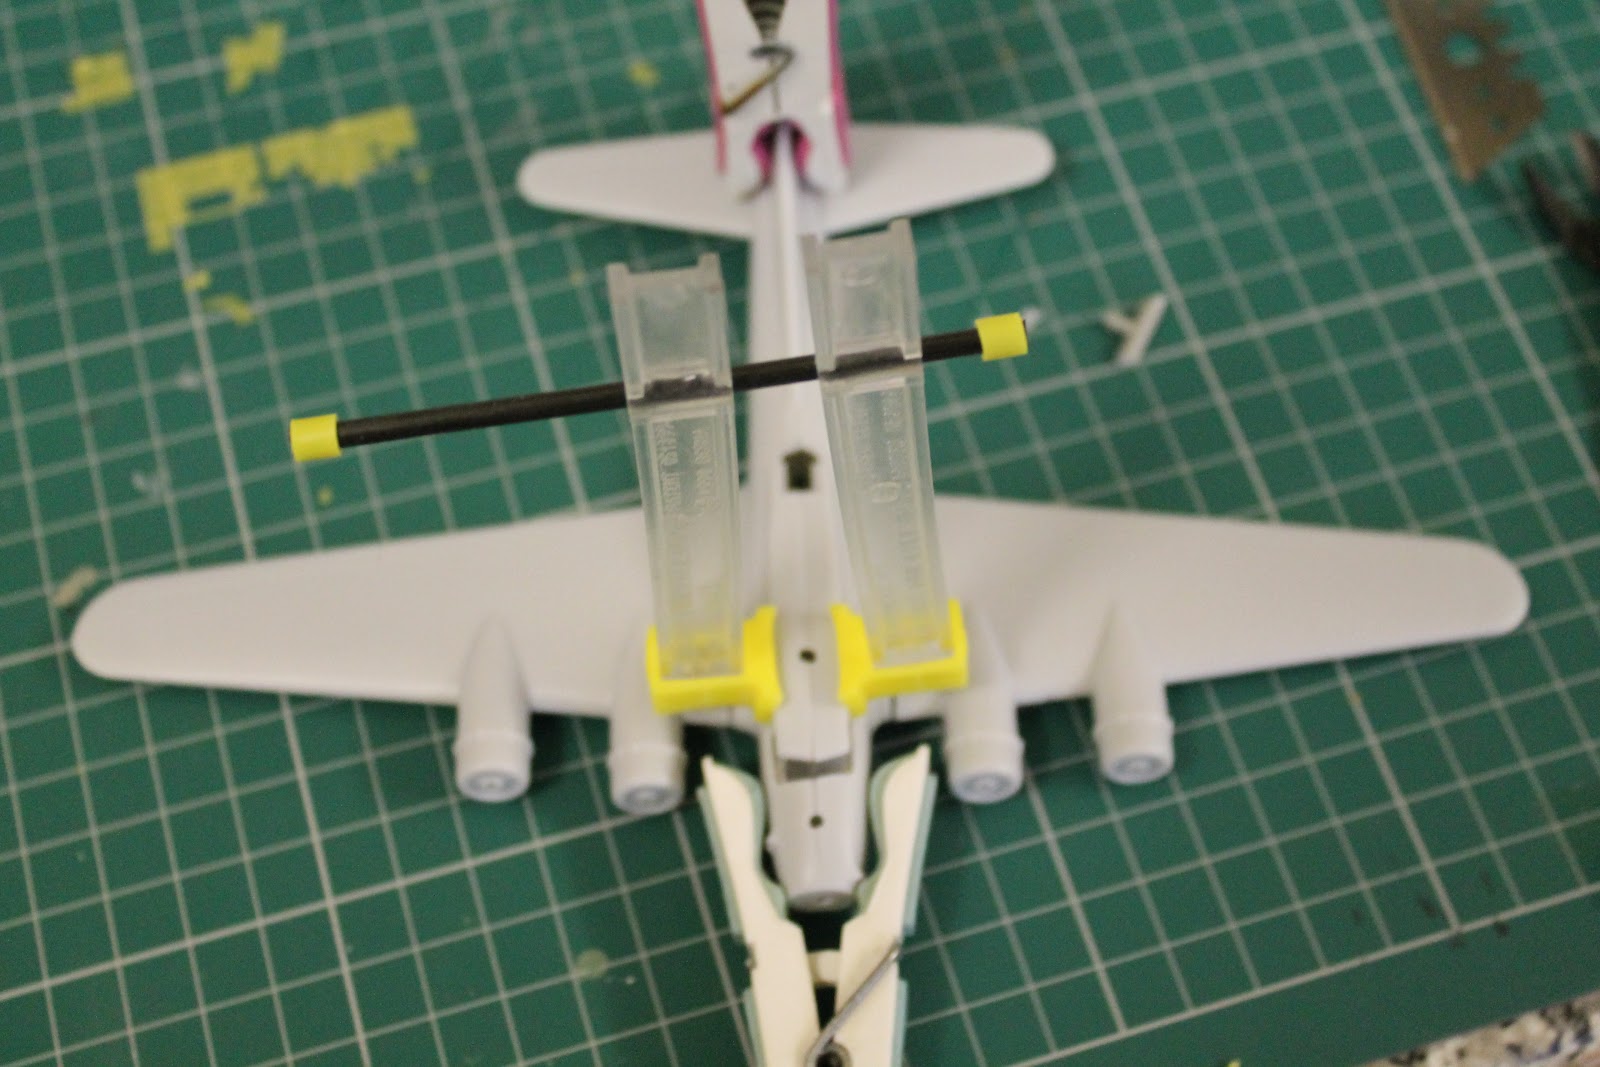
   Here are the fuselage halves being closed up, I haven't glued the wings on yet as I need to do a little work on them.  I have just placed them in their slots to show what to models looks like.  Looks like an B-17 to me. :)


   Tried to get a close up of the cockpit area, think the camera was having a thing for the clamps.  Was focusing on everything except what I wanted it to, might have to use the manual focusing next time.


  And the Fortress next to the Puma, quite a size difference huh?  Wait till the S-37 or the MiG-1.44 go next to it, it will be dwarfed by them.  And that's all that I have done thus far, hoping to get more done next week.  Just wanted to rest this week.

  Peace!

  Dazz

WiP 3 - SA330 Puma


  Well not much has happened this week in regards to modelling.  I've had a really knackering week at work (I had about 7 hours sleep between Sunday to Wednesday, so I crashed out on Wednesday afternoon).  Anyhow I got some modelling done today (Thursday).  Not much mind.  Anyhow done "some" work on the Puma, pictures below.


   Finally managed to get the "canopy" on, it was a struggle as the fit was piss poor.  I think thats more to do with my modelling than the actual way that Revell made it.  I think the left hand side is the pilots seat??  Well I glued the door to that shut, it's a pretty tight fit, which is a good thing.  Not too sure if I am going to leave the doors open or closed yet.


   If I am right then this side is the Co-pilots seat (please correct me if I am wrong).  The door to this side is going to be left open so you can see what is going on in the "office" so to speak.  hoping to get the primer on this next week.  Now that I look at it the canopy looks wrong.  I can't put my finger on what does look wrong but it just does... the seats looking out look cool :)

 
  Tried to get a picture of inside the cockpit, but the camera kept on focusing on the tail-boom.  Oh well you get the idea here.  Nice bottle of super-glue eh?

  Comments welcome.

  PEACE!

  Dazz

Tuesday 25 September 2012

WiP 2 - Revell SA.330 Puma


  I haven't really done much modelling over the last few weeks.  Been getting some rest at home or actually had a social life, makes a change!! :P  Anyhow I'll throw some pics up of where I am with the Puma.


   Well here I have finally closed the fuselage up, it wasn't a good fit, I had to force it close with the clamps.  I've done the straps too big, but meh, least I had a go.  The part that the rotor sits on has to go in the other way to what the instructions say, I found this out the hard way when there was glue on it...


   Tried to get a picture of inside the cabin, not much to see tho, I feel that the fire extinguisher will never be seen again :(


   Otherside, quite impressed with this actually.  Thinking of making the Longbow at the same time.


   A little "side project" of mine, I was masking these up while playing on World of Tanks.  When I was all shot up and dead I was cutting little strips of masking tape and sticking it onto the canopy.  Those little strips on the top of the doors where little buggers to do tho.


  Last one is of this little black disk thing.  I have no idea what it is from, but I know it was made in China... I thought it might of been a base for one of the many Warhammer models I own, but it's not.  Anyhow I am thinking of maybe trying to put some sand on it and depict a landing in the gulf or something.  I am not sure yet.  I've tried to dry fit the canopy already, and the actual fit isn't as good as I hoped it would be.  Got lots of work to do on that... lots of filler to be used and maybe some plastic strip.

  All in all I am getting somewhere with this one, slowly tho.  Hoping to get a little further along in the week.

  Peace!

  Dazz

Thursday 6 September 2012

WiP 1 - SA.330 Puma


  I've had this one for a while, and just didn't know what to do with it regarding the colour.  One scheme is for an Puma at Boscome Down, the usual HC.1 colours and the other is the one on the box during the first Gulf War.  Now I was stuck what to do about the "desert pink" colour... why is it desert pink anyhow?  I dont see any pink in it... just a really weird shade... why isn't it yellow?  I am sure there is a smart person out there who can and probably will eventually tell me why.  Anyhow I made a start on the model.  Only done the cabin thus far... pictures below.


   Just put the memory card in the front to show you the size of the cabin.


   Over painted the white dials, altho this may still work.  I am planing on having the door open so you can see inside the cabin and the cockpit.  Noticed that I missed the back of that chair, amazing how the camera can always show your errors but not your successes...


   And the detail on the other side, not much to say here...
 

   I have been looking on the interwebs for colours and what not, so I decided to make a bash of what seems reasonable.  However one thing that I stole from MerlinJones from the Unoffical Airfix Modellers Forum (hope she/he doesn't mind) is the fire extinguisher... okay thats not correct.  RAF Pumas have the fire extinguisher there anyways but I was reminded of it, by the build that MerlinJones done. It was "made" from a bit of red power wire from a knackered USB cable.  Gotta love building/fixing computers, it gives you so many materials to use in your modelling ;)


  The front end of the cockpit, those wires I made myself.  Not sure if I have pulled it off tho, they where made from a stripped USB wire again.  I gotta add some more bits to make it look better but I am happy with this.  More to come in due course.

  Peace!

  Dazz

Completed Revell 1/144 - Typhoon FGR.4


  I'm on a roll eh?  Thats 3 models in 2 weeks that I have completed... wow.  Well out of the 3, the F-18, F-14 and the FGR-4, this is the one I like the most, don't know why tho.  This was an enjoyable build except for all the troubles I have had with finding the right greys, which have now been sorted.  Learn from your mistakes eh?  I based this model on a picture I have of another Typhoon also from No.11 Sqn but with the tail code "DJ" dropping a Paveway IV (I think).  Hence the bombs being a weird colour and not the standard grey/green.  


   Right where do I start? I put the model on the Soviet parking ramp as I can't find the NATO one... bugger.  I decided not to use the Stormshadows in the end as the only viable hardpoint for them is the ones that's attached to the "supersonic" fuel tanks.  Unfortunately the pylons are moulded onto the tanks so I decided to keep them as they where.  Knowing me I would of taken out the tanks or the pylons or both. :P


   I used my brain and what I know about planes to "make-up" this load out, and when looking for the piture of my base plane I see that there is a picture of this excat load out on Airliners.net (Just do a search in google for "Typhoon FGR4" and it'll be there.) did I call that one or what? :)  I've also just read that the bombs are known as Paveway II's to us and GBU-10's to the Americans/everyone else... not too sure how accurate that is?...  You can see the "pirate" pod just infront of the canopy on the left.


   The other side, not much to say here really, looks like a mean mofo tho.  Still not too sure if it can compete with the Rafale tho, that plane is class I gotta admit.  I had to take my scratchbuild HUD off as the canopy wouldn't fit with it on, couldn't be bothered to make another either.  Nevermind maybe on the next one.


     One model where I didn't obilerate the white paint! WOORAH! I scratch built the pylon for the LITEING III pod, now that I am comparing pictures of this plane to the other ones with this load out I am noticing that the pod/pylon is set a little more forward inbetween the undercarriage doors... oh well. 


   Just a picture of one wing and all of the bloody "No Step" decals it has... this is for ONE side only, you've got the ones underneath and on the spine too (you can just see them there).  Took a bloody age to get them all done.


  After reading Ant Sized Man's suggestion on panel washes, I read somewhere think it was Britmodeller.com that you can use black paint thinned down... so I have tried it.  Not too sure how well it's come out.  Opinions people?  If it's bad I will leave it and find a propper wash if it gets a thumbs up I will try it on the rest of the model.  This was done using Vallejo black and normal tap water.  Not sure myself... Well thats my attempt at an FGR.4 model.

  Peace!

  Dazz

Completed-ish Revell 1/144 F-14D Super Tomcat


  Right I was going to turn this plane into an Bombcat, I was also going to base it on the F-14's I have seen pictures of that where used in Afghanistan/Iraq, but I am not too sure if the Grim Reapers (VFA-101) where deployed to either theatre.  So for the time being I am leaving the weapons, I have seen pictures only of models mind, of the F-14 with a TILAD pod on the right wing hardpoint and an Phoenix on the other... that just sounds wrong to me tbh.  Why would you need an 100km range Air-to-air missile when you are bombing things.  Just seems weird, unless it's for the weight??  Anyhow on to my thoughts of the plane/model.


   All in all the canopy didn't come out half bad imo.  I have tidied up the various white parts but I am really impressed with the decals, maybe thats my forte? :P  I really suck at painting wheels...


   The other side, I have used an Soviet style parking ramp card, oh yeah these are printed/made by Hoys Minatures, but are available from Hannants, I was going to use it for something else yet to be announced :P  The fuel tanks could've been done better, never mind.  Think I will buy this model again in the future and do the other decal option on it, iirc which is a low-vis one.


  Back half of the Cat, I'm really liking the use of Vallejo's Oily Steel for the engine nozzles.  Need to mix some different shades of it for my other models tho.  Think those ejector handles are too big, but I am still massively impressed with them. 


   Took this picture just because that little Grim Reaper decal is the nuts!  Just noticed that the red band above it hasn't gone on too well.  I will need to MicroSol that bugger down.  I also need to revarnish this model, seems a tad too shiny.


   Too the picture of the nose because I love that sharkmouth.  No other reason really :P I was most impressed with that decal, it settled down really well, unlike that bloody red band one.


   Better shot of the sharkmouth and the canopy.  Think I will put some Sidewinders on her just to make her look like she has some bite.  That black bit was painted on, really easy to do too it was :)


  Finally, no Tomcat article/description or anything to do with it, wouldn't be complete without a picture of it's wings swept back.  Such a good looking plane and it was actually useful as well.  Still trying to understand why this was dropped when the F-18's Air-to-air range is useless compared to this.  Oh yeah, I have not put the undercarrage doors on, as they have been eaten by The Great Carpet Monster.  So until I can find them this will have to be a door-less F-14.  Now to make the F-14A I have :)

  Peace!

  Dazz

Wednesday 5 September 2012

Completed Revell 1/144 - F-18 E Super Hornet


  Well I seem to be on a roll right now.  I have finally finished the F-18 E, lovely model one that I wish I could do again and do it differently.  Learned a bit on this one.  I decided not to put any weapons on this one.  I can't really see a CAG aircraft like this being loaded for war tbh.  So they will go into the stash for me to use on another plane.  Well on to the pictures.


   Tried to give it a little "diorama" by using the airfield... postcard.  Thats the only thing I can think to call it.  I got it from Hannants, thought it was going to be bigger tho.  Right onto the model.  First things, yes the canopy has "misted", I sprayed it with satin varnish and totally forgot to mask the canopy.  This is what happens to the canopy when you spray it with a varnish.  You can see all of the decals, even the annoying little ones.  There is a name on the front undercarriage door, thats a good decal and all the little ones on the front nose. 


   Tried a front shot, dont think it came out too well.  God knows where that shadow came from.  That canopy is really screwed :(  Wonder if I can sand it down... those hard points look really good and they are straight too!  I tried to paint the cannon holes, but dont think they came out too well.  Not too sure on the little box thing thats on the nose infront of the canopy.  Think that might be black... nevermind.


   The fuel tank was a bugger to decal up.  Actually thats not true, it wasn't as bad as the arrow thing or the black spine decal.  It was still a bit annoying tho.  The front door isn't level either, bugger.  that rear wheel needed a bit more work too, oh well... That fuel tank does fit in quite well with the plane tho.  Looks nice, dont think I got the red the right shade tho.


   You can see those little grey boxes between the rudders here.  I have no idea what those decals are or if they are in the right place but they look cool none-the-less.  I had no problems with these decals settling down after the usual MicroSol/MicroSet solution.  Not too sure if those engine exhausts look good enough or not.  I only brushed them with Vallejo Grey-Steel... looks okay to me.  But could to with some weathering.


  Right first off, I know I've buggered the white parts up.  I didn't mask them up before I sprayed it for the third time so the white turned into a pale grey.  I tried to brush paint on the white, but for some reason I can NEVER make it look like its gone on evenually... is it just me??  You can see that fuel tank better here. :)  All in all a good model and one I would most likely buy again but I would put on different decals maybe some low vis ones.  Incase you are wondering, my next project is to finish off the SA. 330 Puma.  :)

  PEACE!

  Dazz